 Kia Sorento: Front Wiper Motor Installation
|
1. |
Install the wiper motor.
|
|
2. |
Install the crank arm.
Torque :
12.7-17.6Nm (1.3-1.8, kgf.m, 9.4-13.0 lbf.ft)
|
|
To install the wiper motor crank arm, make sure that the
linkage is aligned with the crank arm in straight line and set
the angle of each linkages exactly.
|
|
|
3. |
Install the lower and upper linkage to the wiper motor crank arm.
|
To install the wiper motor crank arm, make sure that the
linkage is aligned with the crank arm in straight line and set
the angle of each linkages exactly.
Be careful not to bend the linkage.
|
|
|
4. |
Install the wiper motor and linkage assembly and then connect
the wiper motor connector.
Torque :
7-11Nm (0.7-1.1, kgf.m, 5.0-7.9 lbf.ft)
|
|
|
5. |
Install the cowl top cover.
|
|
6. |
Install the windshield wiper arm and blade.
Torque :
22.5~26.4 Nm (2.3~2.7 kgf.m, 16.6~21.7 lbf.ft)
|
|
- |
The windshield wiper motor must be cycled to make
sure that it is in the park position.
If necessary, adjust the wiper arm and blade.
|
|
|
|
7. |
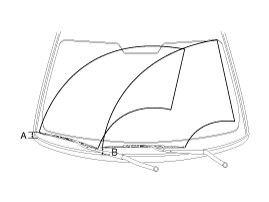
Install the wiper arm and blade to the specified position.
Specified
position
|
A
|
B
|
Distance
[in (mm)]
|
1.37 ┬▒ 0.2
(25┬▒5)
|
1.17┬▒0.2
(30┬▒5)
|
|
|
8. |
Set the cowl top cover on the specified spray position.
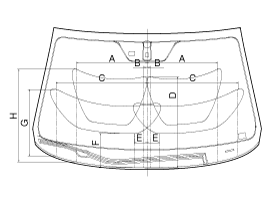
Specified
position
|
Distance (in)
|
Distance (mm)
|
A
|
18.2
|
463.0
|
B
|
0.9
|
24.0
|
C
|
23.5
|
598.0
|
D
|
23.4
|
595.0
|
E
|
3.2
|
82.0
|
F
|
8.7
|
223.0
|
G
|
17.1
|
436.5
|
H
|
23.8
|
606.0
|
|
1.
Remove the windshield wiper arm and blade after removing a nut
(B) and wiper cap (A).
2.
Remove the windshield wiper arm and bla ...
Speed Operation Check
1.
Remove the connector (A) from the wiper motor.
2.
Attach the positive (+) lead from the battery to terminal ...
See also:
Cruise control system
1. Cruise indicator
2. Cruise set indicator
The cruise control system allows you to program the vehicle to maintain a constant
speed without pressing the accelerator pedal.
This system is design ...
Steering Column and Shaft Inspection
1.
Check the steering column for damage and deformation.
2.
Check the joint bearing for damage and wear.
3.
Che ...
Schematic Diagram
...


 Front Wiper Motor Removal
 Front Wiper Motor Inspection