 Kia Sorento: Delivery Pipe Installation
| ŌĆó
|
Install the component with the specified torques.
|
|
| ŌĆó
|
Apply engine oil to the injector O-ring.
|
| ŌĆó
|
Do not use already used injector O-ring again.
|
|
| ŌĆó
|
Do not reuse the bolts.
|
|
| ŌĆó
|
When insert the injector, be careful not to damage the
injector tip.
|
|
| ŌĆó
|
Use proper tooling for change of combustion seal. Take
proper precautions not to damage surface during assembly or
disassembly.
|
|
| ŌĆó
|
Avoid dropping the fuel pipe (including injectors) or
bumping it into any hard objects sincedamage to the internal
components may occur. If necessary, visually inspect and confirmproper
operation with performance tests prior to reuse.
|
| ŌĆó
|
Before installing the injector into the cylinder head,
clean the injector hole and avoidcontaminants from entering
inside the injector hole. When installing the injector, avoid
bumpingthe injector tip into any of the surrounding components
since the tip may become damagedfrom the impact.
|
| ŌĆó
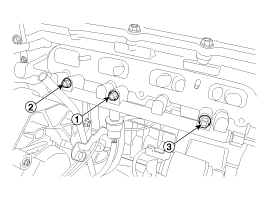
|
When fastening the three fuel delivery pipemounting bolts,
fully hand-tighten first, andthen tighten in the proper sequence
( → →  → →
 ) in several cycles up tothe specified
torque. The delivery pipeshould move less than 1/8 inch (approx.3mm),
whenever each bolt is tightened. ) in several cycles up tothe specified
torque. The delivery pipeshould move less than 1/8 inch (approx.3mm),
whenever each bolt is tightened.
|
|
|
1. |
Install in the reverse order of removal.
Delivery pipe installation bolt:
18.6 ~ 23.5 N.m (1.9 ~ 2.4 kgf.m, 13.7 ~ 17.4 lb-ft)
High pressure fuel pipe installation
nut:
26.5 ~ 32.4 N.m (2.7 ~ 3.3 kgf.m, 19.5 ~ 23.9 lb-ft)
|
|
In case of removing the high pressure fuel pump, high pressure
fuel pipe, delivery pipe, and injector, there may be inju ...
In case of removing the high pressure fuel pump, high pressure
fuel pipe, delivery pipe, and injector, there may be inju ...
See also:
SS-B Solenoid Valve(ON/OFF)
SS-B solenoid valve is attached to the valve body and is an on/off solenoid
valve that is used to change gears.
SS-B Solenoid valve(ON/OFF) is installed at valve body.
...
Vehicle break-in process
No special break-in period is needed. By following a few simple precautions for
the first 600 miles (1,000 km) you may add to the performance, economy and life
of your vehicle.
Do not race the e ...
Description
The ECM (Electro Chromatic inside rear view Mirror) is for dimming the
reflecting light from a vehicle behind at night, in order the user not to be
dazzled by the light. The forward facing se ...

 Delivery Pipe Removal
 High Pressure Fuel Pump Removal