 Kia Sorento: Auto Defogging Actuator Inspection
Second Generation XM (2011-2026) / Kia Sorento XM 2011-2026 Service Manual / Heating,Ventilation And Air Conditioning / Heater / Auto Defogging Actuator Inspection
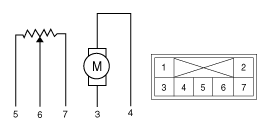
| 1. |
Turn the ignition switch OFF.
|
| 2. |
Disconnect the auto defogging connector.
|
| 3. |
Verify that the auto defogging actuator operates to the open position
when connecting 12V to terminal 3 and grounding terminal 4.
Verify that the auto defogging actuator operates to the close
position when connected in reverse.
|
| 4. |
Connect the auto defogging actuator connector.
|
| 5. |
Turn the ignition switch ON.
|
| 6. |
Check the voltage between terminals 6 and 7.
Specification
It will feedback the current position of the actuator to controls.
|
| 7. |
If the measured voltage is not within specification, substitute
with a known-good auto defogging actuator and check for proper operation.
|
| 8. |
Replace the auto defogging actuator if it is proved that there
is a problem with it.
|
 Auto Defogging Actuator Description
The auto defogging sensor is installed on front window glass. The sensor
judges and sends signal if moisture occurs to blow out wind for defogging. The
air conditioner control module receives ...
 Auto Defogging Actuator Replacement
1.
Disconnect the negative (-) battery terminal.
2.
Remove the cowl side trim.
(Refer to Body - "Crash Pad")
...
See also:
Rear Disc Brake Replacement
1.
Remove the rear wheel & tire.
2.
Loosen the guide rod bolt (B) and pivot the caliper (A) up out
of the way.
...
BJ Boot Removal and Installation
1.
Remove the front driveshaft.
(Refer to Driveshaft Assembly - ŌĆ£Front DriveshaftŌĆØ)
2.
Remove the TJ joint assembly.
(Refe ...
High Pressure Fuel Pump Installation
ŌĆó
Be sure to check the low pressure fuel hose quick-connector
(A) is completely connec ...
Categories
- Home
- First Generation
- Second Generation
- Kia Sorento XM 2011-2026 Owners Manual
- Kia Sorento XM 2011-2026 Service Manual

Copyright ® www.ksmanual.com 2014-2026