
 Kia Sorento: Fuel Tank Removal
| 1. |
Release the residual pressure in fuel line.
(Refer to the Fuel Delivery System - Repair Procedures - "Release
Residual Pressure in Fuel Line")
|
| 2. |
Remove the rear seat assembly.
(Refer to Body - “Rear Seat Assembly")
|
| 3. |
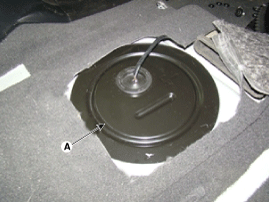
Remove the fuel pump service cover (A).
|
| 4. |
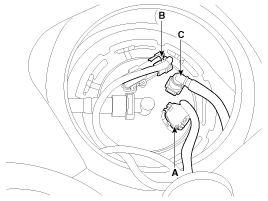
Disconnect the fuel pump connector (A) and the fuel tank pressure
sensor connector (B).
|
| 5. |
Disconnect the fuel feed tube quick connector (C).
|
| 6. |
Remove the rear - LH wheel & tire.
|
| 7. |
Lift the vehicle and support the fuel tank with a jack.
|
| 8. |
Remove the center & rear muffler assembly.
(Refer to Engine Mechanical System - “Muffler”) [4 WD]
|
| 9. |
Remove the propeller shaft.
(Refer to Driveshaft and axle - “Propeller Shaft”) [4WD]
|
| 10. |
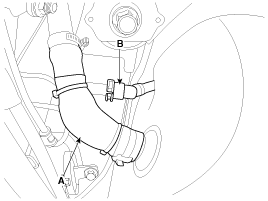
Disconnect the fuel filler hose (A) and the ventilation tube quick-connector
(B).
|
| 11. |
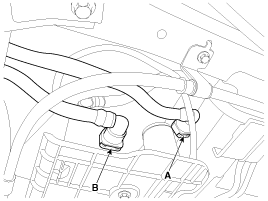
Disconnect the ventilation tube quick-connector (A).
|
| 12. |
Disconnect the vapor tube quick-connector (B).
|
| 13. |
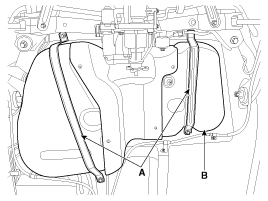
Remove the fuel tank (B) from the vehicle after removing the fuel
tank band (A).
|

 Release Residual Pressure in Fuel Line
Whenever the high pressure fuel pump, fuel pipe, delivery pipe,
or injector is removed immediately after shutting off th ...
 Fuel Tank Installation
1.
Install in the reverse order of removal.
Fuel tank band installation
bolt:
44.1 ~ 58.8 N.m (4.5 ~ 6.0 kgf.m, 32.6 ~ 43.4 lb-ft)
...
See also:
A/C Pressure Transducer Description
The A/C Pressure Transducer (APT) converts the pressure value of high
pressure line into voltage value after measuring it. By converted voltage value,
engine ECU controls the cooling fan by o ...
Balance Shaft & Oil Pump Removal
BSM (Balance Shaft Module) Chain System
1.
Remove the timing chain.
(Refer to Timing System in this group)
2.
Install a stopper pin (A) ...
Alternator Disassembly
1.
Remove the alternator cover (A) using a screw driver after loosening
the nuts (B).
2.
Remove the slip ring guide (A) and then lo ...
Categories
- Home
- First Generation
- Second Generation
- Kia Sorento XM 2011-2026 Owners Manual
- Kia Sorento XM 2011-2026 Service Manual

Copyright © www.ksmanual.com 2014-2026